Pages

LAB 3 : PREPARATION AND STERILIZATION OF CULTURE MEDIA

INTRODUCTION


Nutrient agar is a microbiological growth medium commonly used for the routine cultivation of non fastidious bacteria. It is useful because it remains solid even at relatively high temperatures. Also, bacteria grown in nutrient agar grows on the surface, and is clearly visible as small colonies. Nutrient agar consists of peptone, beef extract and agar. 

This relatively simple formulation provides the nutrients necessary for the replication of a large number of microorganisms that are not excessively fastidious. The beef extract contains water soluble substances including carbohydrates, vitamins, organic nitrogen compounds and salts. Peptones are the principle sources of organic nitrogen, particularly amino acids and long chained peptides. 

After we prepare the nutrient agar and other materials needed, we have to sterilize them in order to prevent them from any sources of contamination as well as to ensure them being free from any types of microbes. The process of sterilization may vary with the different types of requirements for handling and disinfecting the materials.


PROCEDURES.
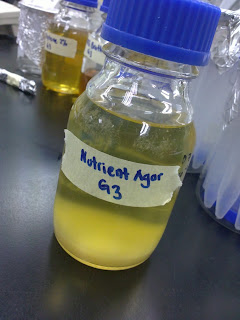
1.  1.  7.00 g of nutrient powder was weighed by using analytical balance and was put in the scott bottles.

2.    2. 250 ml of distilled water was measured by measuring cylinder and was add up in the scott bottle containing nutrient powder. Nutrient media was mixed up with distilled water.

3.    3. Recap the bottles loosely and set aside for the sterilization.

4.    Steps one to three was repeated for 10.45g in 100 ml MRS broth and 5.00 g in 250 ml peptone 2%.

5.    4.Then, all media was sterilized at 121˚C for 15 minutes by using autoclave.


1.      
  
7.00 g nutrient agar


7.00 g in 250 mL nutrient agar


10.45 g MRS broth
10.45 g MRS broth in  100 mL


5.00 g peptone in 250 mL.
5.00 g peptone.


autoclave


Materials and reagents.

DISCUSSION

An autoclave is an instrument used to sterilize equipment and supplies by subjecting them to high pressure saturated steam at 121 °C or more, typically for 15–20 minutes depending on the size of the load and the contents.
The autoclave comes in several types. One of the simplest autoclaves looks a great deal like a pressure cooker. It is a large pot with a gauge on top and bolts that fasten the top to the pot. The idea behind this is that water inside a pressurized container can be heated above the boiling point. It will only reach 212 degrees Fahrenheit (100 Celsius) in an open container. However, in a pressurized autoclave, the water will reach much higher temperatures.
When microbiological media has been made, it still has to be sterilized because of microbial contamination from air, glassware, hands, etc. Within a few hours there will be thousands of bacteria reproducing in the media so it has to be sterilized quickly before the microbes start using the nutrients up. The sterilization process is a 100% kill, and guarantees that the medium will stay sterile UNLESS exposed to contaminants by less that adequate aseptic technique to exposure to air.
Media sterilization is carried out with the autoclave, basically a huge steam cooker. Steam enters into a jacket surrounding the chamber. When the pressure from the steam is at a certain point in the jacket, a valve allows the steam to enter the chamber. The pressure will go up over 15 pounds per square inch (psi): at this point the timer begins to count down---usually for 15 minutes, depending on the type of media. The high pressure in a closed container allows the temperature to go above the highest temperature one could get by just boiling, around 121 degrees C. Therefore, the parameters for sterilization with an autoclave are 121 C at >15 psi for 15 minutes. Fifteen minutes is the thermal death time for most organisms (except some really hardy sporeformers).


Conclusion

The preparation of nutrient agar for culturing microorganism is done by using autoclaving technique in order the material to be sterilized. It is very important to ensure that all of the trapped air is removed. Proper autoclave treatment will inactivate all fungi, bacteria, viruses and also bacterial spores, which can be quite resistant, It will not necessarily eliminate all prions.

REFERENCES


1.    

2.2: Neubauer Chamber

INTRODUCTION

Neubauer chamber or hemocytometer are more convenient for counting microbes. For microbiology, cell culture, and many applications that require use of suspensions of cells it is necessary to determine cell concentration. One can often determine cell density of a suspension spectrophotometrically, however that form of determination does not allow an assessment of cell viability, nor can one distinguish cell types.
The neubauer chamber is a heavy glass slide with two counting areas separated by a H-shaped through figure. To prepare the counting chamber the mirror-like polished surface is carefully cleaned with lens paper. The coverslip is also cleaned. Coverslips for counting chambers are specially made and are thicker than those for conventional microscopy, since they must be heavy enough to overcome the surface tension of a drop of liquid. The coverslip is placed over the counting surface prior to putting on the cell suspension. The suspension is introduced into one of the V-shaped wells with a pasteur or other type of pipet. The area under the coverslip fills by capillary action. Enough liquid should be introduced so that the mirrored surface is just covered. The charged counting chamber is then placed on the microscope stage and the counting grid is brought into focus at low power.
It is essential to be extremely careful with higher power objectives, since the counting chamber is much thicker than a conventional slide. The chamber or an objective lens may be damaged if the user is not not careful. One entire grid on standard hemacytometers with Neubauer rulings can be seen at 40x (4x objective). The main divisions separate the grid into 9 large squares (like a tic-tac-toe grid). Each square has a surface area of one square mm, and the depth of the chamber is 0.1 mm. Thus the entire counting grid lies under a volume of 0.9 mm-cubed.

RESULTS


1 small box = 1mm / 4
                   = 0.25 mm

Average of cell numbers =  2 + 2 + 2 + 4 + 5 / 5
                                                = 3
Volume of one small box = Area x Depth
                                                = 0.25 mm x 0.25 mm x 0.1 mm
                                                = 6.25 x 10 ⁻ᶟ mmᶟ
                                                = 6.25 x 10 ⁻ᶟ x 10⁻ᶟ cmᶟ
                                                = 6.25 x 10 ⁻⁶ cmᶟ
                                                = 6.25 x 10 ⁻⁶ mL
Concentration of cells    = average number of cells / volume
                                                = 3 / 6.25 x 10⁻⁶ mL
                                                = 480 000 cells/ mL

DISCUSSION

A device used for determining the number of cells per unit volume of a suspension is called a neubauer chamber. The most widely used type of chamber is called a hemocytometer, since it was originally designed for performing blood cell counts.
One entire grid on standard hemacytometers with Neubauer rulings can be seen at 40x (4x objective). The main divisions separate the grid into 9 large squares (like a tic-tac-toe grid). Each square has a surface area of one square mm, and the depth of the chamber is 0.1 mm.
Volume.(calculation)
square has surface area of 1 mm-squared and a depth of 0.1 mm
1.0mm ÷ 4 =0.25mm
Area of the square
Length × width = 0.25mm × 0.25mm
                            = 0.0625mm²
volume = area × depth
              = 0.0625 mm² × 0.1 mm
              = 6.25 × 10¯³ mm³
              = 6.25 nm³


If measuring mitotic index (fancy name for % dividing cells), have a separate
clicker to count the number of cells dividing and just divide this by the total number of
algae counted (x100%).
replicate counts are depends on the amount of variability between counts and
the worse the technique, the more replicate chamber counts you will have to perform. It
also depends on how critical it is to get an accurate count.

REFERENCES ( for 1.1 and 1.2 )
academic.keystone.edu/JSkinner/Ocular%20Micrometer.doc

LAB 2: MEASUREMENT AND COUNTING OF CELLS USING MICROSCOPE

2.1: Ocular Micrometer

INTRODUCTION

Ocular micrometer
Ocular micrometer is use in order to measure and compare size of prokaryotic and eukaryotic microorganisms. Suitable scale for their measurements should be somewhere in the microscope itself. An ocular micrometer is a glass disk that attaches to a microscope's eyepiece. For this an ocular micrometer serves as a scale or rule to measure the size of magnified objects. Ocular micrometer is simply a disc of glass upon which is etched lines. The ruler on a typical ocular micrometer has between 50 to 100 individual marks, is 2 mm long and has a distance of 0.01 mm between marks.
Technicians can easily make calculations of object size after measuring an object against the dimensions of an ocular micrometer, which are calibrated using a stage micrometer, a microscope slide with its own surface scale visible when viewed through the microscope. Because the micrometer measures a flat dimension, consider the three-dimensional aspect of the measured object. For example, the length of a curved surface may be longer than the ocular micrometer measured length.
The ocular micrometer was located inside the ocular lens placed with eyes over the microscope eyepiece. The ocular micrometer is the visible scale shown as you look through the eyepiece. Each line represents 1 micrometer.

Ocular micrometer calibrated using stage micrometer    

Figure 1.1: ocular micrometer


RESULTS

Each division of the stage micrometer = 1 m
i.                    For 40x magnification,
10 eyepiece division  = 15  stage division  = 15 µm
1 eyepiece division = 15 µm / 10 = 1.5 µm
Size of yeast   : long x width
                                                    : 7.5 µm x 9 µm

ii.                  For 100x magnification,
10 eyepiece division  = 11  stage division  = 11 µm
1 eyepiece division = 11 µm / 10 = 1.1 µm
Size of yeast   : long x width
                                                    : 11 µm x 13.2 µm

iii.                For 400x magnification,
11 eyepiece division  = 40  stage division  = 40 µm
1 eyepiece division = 40 µm / 11 = 3.6 µm
Size of yeast   : long x width
                                                    : 144 µm x 162 µm

DISCUSSION
An ocular micrometer is a small glass disk with thin lines and numbering etched in the glass.
An ocular micrometer was placed into one ocular on your microscope so that the lines superimposed on the image will allow to measure the specimen.
For each magnification, must compare the lines on the ocular micrometer to the lines on a stage micrometer.
The stage micrometer is a glass slide with precisely space lines etched at known intervals.
The vertical distance of an object that is in focus.  When magnification is increased, less of the object is in focus (depth of field decreases) – but greater detail of the area in focus can be seen.
You may have to adjust the focus of your eyepiece in order to make the scale as sharp as possible. If you do that, also adjust the other eyepiece to match the focus. Any ocular scale must be calibrated, using a device called a stage micrometer
The ocular lenses usually magnify 10X.  Thus the total magnification observed is the multiplication of the power of magnification of the ocular times the objective.  For example an object magnified by the ocular and the 40X high-dry objective is viewed at 4002 times its real size.  Most ocular lenses can be moved back and forth to adjust to the interpupillary distance of the student.  When first using the microscope, adjust the ocular lenses back and forth until a circular field is viewed with both eyes open.  Additionally, many microscopes allow the ocular lenses to be adjusted up and down (mechanical tube length adjustment) and there is a scale alongside the tube.  After adjusting the interpupillary distance, read the distance off the scale and adjust the tube length of the ocular lens to the same value.  Now the ocular lenses are adjusted to your eyes.


LAB 1: 1.2

1.2 Examination of cells.

Introduction.


Since bacteria are extremely small, they are not usually being studied with the low power dry objectives or high power dry objectives but instead they are stained and observed with oil immersion objectives.

An oil immersion lens are used when you have a fixes ( dead-not moving) specimen that is no thicker than a few micrometers. Even then, use it only when the structures you wish to view are quite small- one or two micrometers in dimension. Oil immersion is essential for viewing individual bacterial or details of the striations of skeletal muscle. It is nearly impossible to view living, motile protist at a magnification of 1000x, except for the very smallest and slowest. 

A disadvantage of oil immersion viewing is that the oil must stay in contact, and oil is viscous. Oil distorts images seen with dry lenses, so once you place oil on a slide, it must be cleanned off thoroughly before using the high dry lens again. Oil on non-oil lenses will distort viewing and possibly damage the coatings. 


Steps in placing oil immersion.


The other method in observing the specimen is using the wet mount method. In a wet mount, the specimen is suspended in a drop of liquid ( usually water ) located between slide and cover glass. The refractive index of water improves the image quality and also supports the specimen. In contrast to permanently mounted slides, wet mount cannot be stored over extended time periods, as the water evaporate.
Wet mount sample.


Results.

Clostridium perfringes
10 x 100


Discussion. 
By using the wet mount methods, the cell was observed in coccus shaped and colourless. The cell has a motility characteristic.

Conclusions.


The image of moving stained microorganism also can be captured clearly through 10x objective X 10x eyepiece=100x magnification bright microscope. It also can use the highest resolving power to demonstrate these preparations because of their thinness. The deformation of light path is minimum as there are need be only one layer of differing refractive index, if oil-immersion objective and condenser is used. 

References.


LAB 1: PRINCIPLES AND USE OF MICROSCOPE

1.1 Setting up and using the microscope

Introduction


In order to be seen, microorganisms need to be magnified. Despite advances in other area of microscopy (for example, the electron microscope), the light microscope is still the instrument most frequently used for viewing microorganisms. The science of investigating small objects using such an instrument is called microscopy.

The part of microscope.
The following description is generalized to cover a typical microscope (see figure below)


The light source bulb is located in the base of the microscope. It projects light upwards through the diaphragm, the specimen and the lenses in order for the specimen to be seen. The on–off switch turns on the current to the bulb while the voltage control dial control the brightness of the bulb.
          
The diaphragm has different sized holes and is used to vary the intensity and size of the cone of light that is projected upward into the slide. It acts like the iris of our eyes. There is no set rule regarding which setting to use for a perticular power. Rather, the setting is a function of the transparency of the specimen, the degree of contrast you desire and the particular objective lens in use.


The stage is the platform where you place your slide. Stage clips hold the slides in place. If your microscope has a mechanical stage, you will be able to move the slide around by turning two knobs. One moves its left and right, the other moves up and down.


The fine-focus adjustment knob and coarse-focus adjustment knob are used to move the stage either upwards or downwards. The only difference between them is the fine-focus adjustment knob moves the stage slightly while the coarsefocus adjustment knob moves the stage rapidly. Thus, the coarse-focus adjustment knob should not be used while you are examining a specimen.


The light microscope has a 4 objective lenses which are located on the revolving nosepiece. They consist of 4x, 10x, 40x, and 100x powers. When coupled with a 10x eyepiece lens, you will get a total magnifications. The shortest lens is the lowest power, the longest one is the lens with the greatest power. It focuses the light passing through the specimen to form a magnified primary image.
            
The body tube or the eyepiece tube is used to connect the eyepiece to the objective lenses. It also receives the light coming through the objective and redirects it to the eyepiece.                    
      
The ocular lens or also known as the eyepiece are the lens at the top that you look through. They are usually 10x or 15x power. It consist of several lenses that collects the light from the eyepiece tube, focus it and transmit light to your eyes so that the specimen can be seen.    


Magnification and resolution.
The total magnification of the specimen or sample observed are calculated by multiplying the objective lens multiplication power and the eyepiece lens multiplication power. The calculations are as shown below:

4x objective X 10x eyepiece = 40x magnification
10x objective X 10x eyepiece = 100x magnification
40x objective X 10x eyepiece = 400x magnification
100x objective X 10x eyepiece = 1000x magnification


The minimum distance between two points which is visible through a microscope (lenses) is termed as resolution of a microscope. The ability of a microscope to distinguish between two separate objects is called the resolving power of the microscope. Sometimes, blurred images may be seen through the lenses. This is because of the placing of two distinct points too close to each other, which results in overlapping of the images. Magnification can neither improve nor decrease the resolving power of the microscope.


Result 

1. Escherichie coli
10x objective X 10x eyepiece
colour : light pink
rod-shaped
This virulent strains of E.coli can cause urinary tract infections. 


 2. Stophyloccus aureus
10x objective X 40x eyepiece
colour: dark green
shape: grape-liked cluster ( small rounds )
a gram-positive bacteria 
Staphylococcal toxins are a common cause of food poisoning as they can be produced in improperly-stored food.


Clostridium perfringes
10x objective X 40x eyepiece
rod-shaped
third-most-common cause of food-borne illness

 Discussion.


Staphylococcus aureus is facultative anaerobic and gram-positive cocci which occur singly in pairs and irregulular clusters. Under microscope that we observed with 10x40 magnifications the colour of staphylococcus aureus is dark green. Staphylococcus aureus is non-motile, non-spare forming,catalase and coagulase positive. S.aureus is catalase positive can produce enzyme catalase. It is able to convert hydrogen peroxide to water and hydrogen. Also it makes the catalase test useful to distinguish staphylococci for entrococci and streptococci. S.aureus strains many appear in dirty white and nonhemolytic.

Escherichia coli are a gram negative, faculatative anaerobic and non-spore forming. Cells of E.coli typically rod-shaped with 1 to 2µm wide and 3 to 30µm long. E.coli uses mixed- acid fermentation in anaerobic conditions, produce lactase, succinate, ethanol, acetate and carbon dioxide. Optimal growth of e.coli occurs at 37ºC with temperature of up 49 ºC (120ºF). 

Clostridium perfringes are spore forming of the genus clostridium and gram positive bacillus. Clostridium perfringes same with E.coli shape, that is rod-shaped and anaerobic. On blood agar plates, C.perfringes grown anaerobically produces flat, spreding, rough, translucent colonies with irregular margins.


Conclusion

From the experiment, we can conclude that 10x objective X 10x eyepiece=100x magnification can show a very clear image of culture studied. The bright field microscope also show a very clear colored image.


References.
http://en.wikipedia.org/wiki/Clostridium_perfringens
http://en.wikipedia.org/wiki/Staphylococcus_aureus
http://en.wikipedia.org/wiki/Escherichia_coli